Managing Record Contacts
You can associate one or more reference contacts with an application or a service request. You can also create new record contacts by entering details about the contact on the Contacts tab of the record detail form portlet. Depending on your user privileges, you may also be able to look up a contact from your reference database and simply add the contact information that way.
The Manage Contacts menu on the Contacts tab provides you with a list of actions that you can perform on one or more records. For example, you can look up contacts to add to a record, add a new contact, and synchronize record contacts with their reference source.
Topics
Accessing the Manage Contacts Menu
Go to the appropriate portlet, then locate and choose the building permit or the service request you want to work with.
Civic Platform displays the detail portlet on the record tabs.
Click the Contacts tab.
Civic Platform displays the record contacts list page.
Hover your mouse cursor over the Manage Contacts button in the toolbar.
The Manage Contacts menu displays.
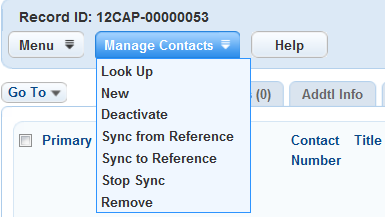
Left click any option in the menu to select it.
Adding a Contact from Reference Contacts
You can associate one or more contacts with a record. Depending on your user privileges, you may also be able to look up a contact from your reference database and add all the reference contact information to your record. If you cannot find the reference contact you want to add, you have the option to create the reference contact right away.
To add a contact to a record from reference contacts
On the Contacts tab for the record you are working on, hover over the Manage Contacts button (Accessing the Manage Contacts Menu), then select Look Up from the menu.
Civic Platform displays the contact look-up form.
Enter search criteria as needed to find the contact you seek, then click Submit. You can search reference contacts by contact standard fields, contact activities, or contact addresses. See Examining Contact Details for field definitions.
Civic Platform displays your search results.
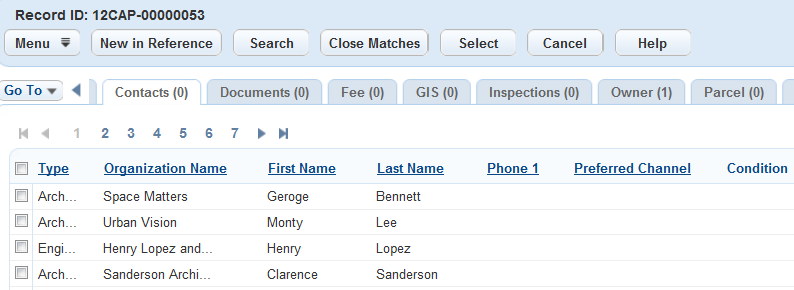
Note:You may have specified the contact type and type in the search criteria. However, Civic Platform ignores the type information when performing the search, because users can add reference contacts of any type to records in various roles (transaction contact types).
If the search results contain the contact(s) you want to add, select the contact you want to add and click Select.
Civic Platform adds the contact to the record.
If the search results do not contain the contact you want to add, you can click Close Matches to retrieve close match contacts (see Looking for Close Matches).
You can also click New in Reference to create a new reference contact.
If the selected contact has only one contact address, Civic Platform adds the selected contact to the record with its contact address.
If the selected contact has multiple contact addresses, you can select which contact addresses to add in the pop-up Contact Address Look Up Form and then click Select.
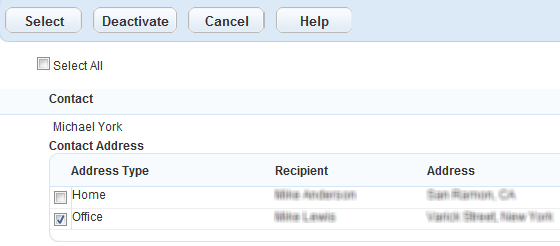
Civic Platform adds the selected contact in the record contact list.
Change the contact type for the newly-added contact as needed. For more information, see Editing a Contact on a Record.
Adding an Internal User as a Contact
Depending on your user privileges, you may be able to look up an internal user on your staff and associate that user as a contact on a record.
Note:
Enable FID 8506 - Internal User, to make the Look Up Staff command available in the Manage Contacts menu on the Contacts tab of a record. This command provides the ability to associate internal users to an application/record as a contact. |
Once added, you can configure that contact to receive email notifications and updates for that record. This gives internal staff such as case workers, investigators, or inspectors the ability to stay on top of a case as it moves through its life cycle.
To add an internal user as a contact on a record
-
Open the record you want to work with, and navigate to the Contacts section.
-
Hover on the Manage Contacts button to display a command menu.
-
Select Look Up Staff.
-
Enter search criteria to locate the staff member you want to add.
-
Click Submit.
The search results display.
-
Select the contact you want from the results list.
-
Click Select.
A contact form displays. Some of the internal user’s data displays.
-
Complete the rest of the form with available data.
-
Click Submit.
The new contact is added to the record.
Adding a New Contact
You can add contacts manually to a record. Some agencies restrict users from adding certain types of transactional contacts, preferring that you add them as reference contacts instead. But for cases where transactional contacts are permissible, you can manually add new contacts to a record without creating a reference contact.
To add a new contact to a record
On the Contacts tab for the record you are working on, hover over the Manage Contacts button (Accessing the Manage Contacts Menu), then select New.
Civic Platform displays the new contact form.
Enter available data in the contact fields. See Contact Detail for field definitions.
In the Contact Address sub section, add the address information for the contact.
If you selected a contact type that you are allowed to create transactional contacts for, click Submit. Otherwise, go to the next step.
Civic Platform adds the contact as a transactional contact to the record.
If you selected a contact type that can only be added as a reference contact, click Submit:
Civic Platform displays a list of reference contacts matching the information that you entered.

You can proceed in one of three ways:
Select a contact from the search results, then click Select.
Click Close Matches to retrieve more close match contacts, select a contact from the new list, and then click Select.
Click New in Reference to create a new reference contact, complete the fields in the new contact form, and click Submit. Once done, you can select the contact you just created, and click Select.
Civic Platform adds the reference contact to the record.
Editing a Contact on a Record
You can edit contact information on an application or a service request record as needed.
To edit a contact on a record
Go to the Contacts tab for the record you are working on.
Civic Platform displays a list of contacts associated with the record.
If you want to change the contact type, select a type from the Type drop-down list.
Civic Platform updates the record contact with the new type.
Note:Different contact types may require different contact template fields and contact addresses. If you change the type, you may lose the template fields and the contact addresses that Civic Platform associated with the old type.
If Civic Platform requires template fields for the new contact type, Civic Platform prompts you to enter the required information. Click Yes to continue. and go to Edit any of the fields that display in the Contact Detail section. See Contact Detail for a list of field descriptions. to complete the required information.
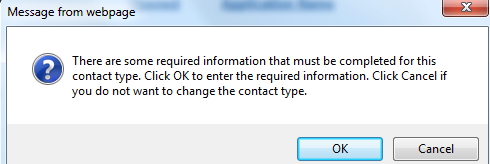
If you want to edit the contact or contact address details, click the Contact Number link for the contact.
Civic Platform displays the contact details.
Edit any of the fields that display in the Contact Detail section. See Contact Detail for a list of field descriptions.
Click Submit.
Managing the Synchronization of Contacts
When you add a record contact by looking up a reference contact (Adding a Contact from Reference Contacts), the record contacts list provides a Reference Contact ID column and a Sync column. The Sync column indicates whether a record contact is in sync with its reference or not. For each individual record contact, you can choose to synchronize it from or to its reference contact, or you can choose to break the synchronization.
If you added a contact as a transactional contact, there is no corresponding reference contact, so the Reference Contact ID column is null, and the Sync column value is No. However, you can still look up a reference contact and synchronize the reference contact with the record contact. After synchronization, the record contact links with the reference contact in the same way as the contact that you add to a record from reference.
Note:
The best practice when adding a contact to a record is to search for and select a contact from existing reference contacts. This method enables you to save time by applying the reference contact information to the record. You can also avoid duplicate contact information in the database. |
Topics
Synchronizing a Record Contact from its Reference
Record contacts may not be as current as reference contacts. If a record contact is currently not in sync with the reference, you can the record contact data with the more current reference contact information.
To synchronize a record contact from its reference
Go to the Contacts tab for the record you are working on.
Civic Platform displays a list of contacts associated with the record.
Select the contact you want to synchronize from its reference. You can only synchronize one record contact at a time.
Hover over the Manage Contacts button, and select Sync from Reference.
If Civic Platform already associates the record contact with a reference contact, Civic Platform synchronizes the record contact with the reference contact.
If Civic Platform does not yet associate the record contact with a reference contact, you must select the reference contact to synchronize. Complete the following steps:
In the reference contact lookup form, enter search criteria as needed to find the contact you seek, then click Submit. You can search reference contacts by contact standard fields, contact template fields, contact activities, or contact addresses. See Contact Detail and Contact Address Fields for field definitions.
Civic Platform displays your search results.
If the search results do not contain the contact you want to find, click Close Matches to retrieve close match contacts. For more information on close match search, see Looking for Close Matches.
Select the contacts you want to synchronize to the record contact and then click Select.
Civic Platform synchronizes the record contact with the reference contact.
After the synchronization:
The record contact stays in synchronization with the reference contact.
The Sync column of the record contact changes to Yes.
If the previous record contact contains some contact addresses, Civic Platform adds the contact addresses to the reference contact while also keeping them in the record contact. For more information on contact addresses, see Managing Contact Addresses of a Contact.
The contact template fields in the selected reference contact may be different from the contact template fields in the current contact role in the record. If some template fields are common to both, Civic Platform copies the values in the fields from the reference contact to the record contact. If some template fields are unique in the reference contact, the fields remain hidden in the record contact.
Synchronizing a Record Contact to its Reference
After you update a record contact, if the record contact is currently not in sync with the reference, you may want to synchronize the information to its reference contact.
To synchronize a record contact to its reference
Go to the Contacts tab for the record you are working on.
Civic Platform displays a list of contacts associated with the record.
Select the contact you want to synchronize to its reference. You can only synchronize one record contact at a time.
Hover over the Manage Contacts button, and select Sync to Reference.
If Civic Platform already associates the record contact with a reference contact, Civic Platform synchronizes the record contact with the reference contact.
If Civic Platform does not yet associate the record contact with a reference contact, you must select or create a reference contact to synchronize. Complete the following steps:
In the reference contact lookup form, enter search criteria as needed to find the contact you seek, then click Submit. You can search reference contacts by contact standard fields, contact activities, or contact addresses. See Contact Detail and Contact Address Fields for field definitions.
Civic Platform displays your search results.
If the search results do not contain the contact you want to find, click Close Matches to retrieve close match contacts. For more information on close match search, see Looking for Close Matches.
To synchronize the record contact to an existing reference contact, select the contact you want to synchronize the record contact to and click Select.
Civic Platform synchronizes the transactional contact to the reference contact.
To synchronize the record contact to the reference as a new reference contact, click New in Reference to create a new reference contact. After you complete the fields in the popup Contact New Form, click Submit.
Note:The standard contact fields display as read-only in the contact new form, with the values populated from the record contact.
If some template fields are common in the record contact and the reference contact, the template fields are editable in the contact new form, with the values populated from the record contact.
Do not edit the values, because when Civic Platform synchronizes the existing information from the record contact to the new reference contact, your changes get overwritten.
Civic Platform creates the new reference contact as specified, and associates it with the record contact.
After the synchronization:
The record contact information synchronizes to the reference contact.
The record contact stays in synchronization with the reference contact. Civic Platform synchronizes the change in either side to the other side.
The Sync column of the record contact changes to Yes.
If the previous record contact contains some contact addresses, Civic Platform adds the contact addresses to the reference contact while also keeping them in the record contact. For more information on contact addresses, see Managing Contact Addresses of a Contact.
Stopping Synchronization between a Record Contact and its Reference
You can choose not to synchronize the information between a record contact and its reference source.
To stop synchronization between a record contact and its reference
Go to the Contacts tab for the record you are working on.
Civic Platform displays a list of contacts associated with the record.
Select the contact you want to synchronize to its reference. You can only synchronize one record contact at a time.
Hover over the Manage Contacts button, and select Stop Sync.
Civic Platform changes the Sync field to No for the record contact.
Removing or Deactivating a Contact on a Record
If you remove a contact from the record Contacts tab, the contact no longer displays in the record contacts list. If you deactivate a contact, the contact still displays in the record contacts list, and the contact status becomes Inactive.
To remove or deactivate a record contact
Go to the Contacts tab for the record you are working on.
Civic Platform displays a list of contacts associated with the record.
Select the contact you want to remove or deactivate.
To remove the contact
Hover over the Manage Contacts button.
Select Remove.
Civic Platform removes the contact.
To deactivate the contact
Hover over the Manage Contacts button.
Select Deactivate.
Civic Platform displays a pop-up End Date window.
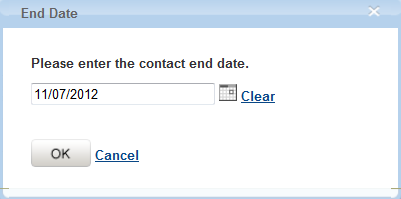
Enter the contact end date, and then click OK.
Civic Platform sets the contact End Date to the specified date, and changes the contact status to Inactive.